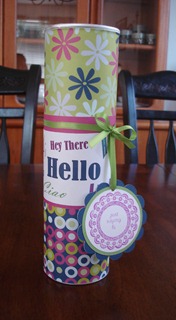
Another cute example of what you can do with the stamp set that I have up for grabs on my Free Blog Candy Giveaway. (see Free Blog Candy post below)

Hey mom, this one is for you! You asked if I could do anything with a Pringles’ can. And , before I start… yes I baked the cookies and gave them a perfectly round shape by cutting them with a circular cookie cutter while they were still warm!
Here is a list of supplies:
- An empty Pringles can.
- Two or more sheets of coordinating paper.
- Ribbon
- stamp and stamp pad
- scissors
- adhesive

The two pieces of paper shown here are 5 1/8” x 12” each.

The pink paper measures 3 5/8” x 12”

The “hello” sayings paper is 2 7/8 “ x 11”
I did not have any paper or stamps that said “hello” or had any type of “hello sayings” on it… so I made it myself. I went into MS Word, set my paper settings to landscape, typed Hello, Hey There, Howdy, Ciao, Hi, Bonjour, Hallo and Hola. Then went back and changed the fonts and colors to coordinate with the craft paper I was using and printed it out on regular printer paper.

To make the tag, I used the “just saying hi” stamp inside a “round frame”. Both stamps are from the stamp set that is up for grabs on the Free Blog Candy Giveaway. (see Free Blog Candy post below)

Last but not least, tie the ribbon around the can and attach the tag. I also made a tag for the lid of the can using only the white and green circles.
A standard Pringles can will hold about 20 cookies.

I hope you have enjoyed this tutorial. I will be tackling the small Pringles can later!


2 comments:
Too cute!! Luv the pringle can!
What a great idea I love this!
Post a Comment